ckbunker
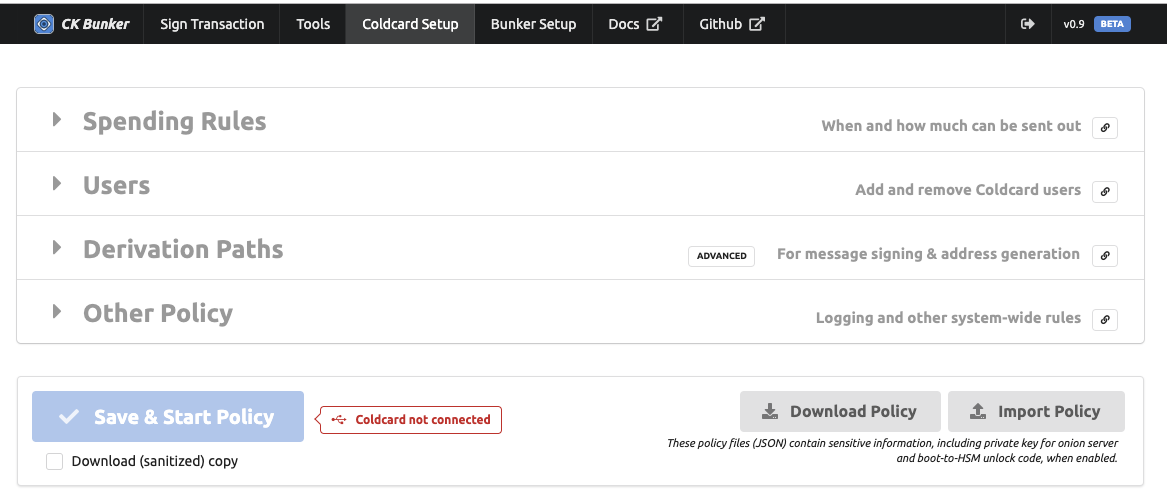
HSM Policy Config

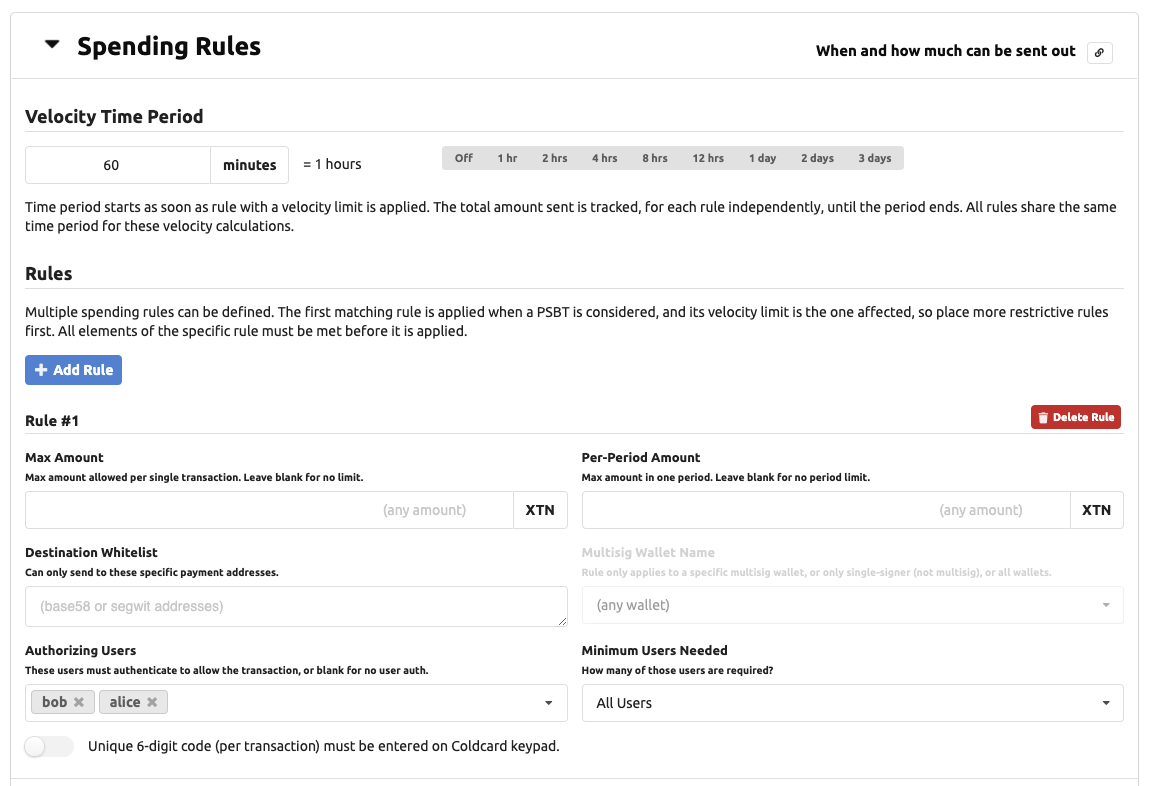
Spending Rules
Multiple spending rules can be defined. The system scans the rules starting from the first one, and will test each rule. The first rule that is satisfied is applied and following rules are not considered.
We recommend putting the most narrow rules first. Catch-all rules, which might move more money should be later in the list.
By combining multiple rules, with diffent restrictions, it’s possible to create a secure and yet flexible policy.

Velocity Time Period
To implement spending limits based on time, the Coldcard requires you to define a period. This period, expressed in minutes, applies to all rules. Any rule with a defined “Per-Period Amount” value, will be affected.
The period starts when it is first used. There is no absolute concept of time on the Coldcard because it doesn’t have a real time clock. There is only one period, so it will begin as soon as any rule using a velocity limit is applied successfully.
At the end of the time period, the totals are reset to zero.
Individual Rules
Each rule consists of these values, which are all considered at the same time.
- Max Amount: max BTC per transaction, that this rule can apply to (independent of period)
- Per-Period Amount: total BTC that can move thu this rule in the period
- Destination Whitelist: a list of specific addresses which are allowed as destinations
- Multisig Wallet Name: either name of a multisig wallet, or
1indicating rule only applies to non-multisig wallets. - Authorizing Users: a list of users that are able to approve the transaction (N) _ Minimum Users Needed: number of users (M) needed to approve (from list of users for this rule, not the system)
- Local Confirmation Code needed: a local user must (also) approve (via 6-digits entered on keypad)
When an element of the rule is has no value, then the restriction does not apply. For example, if Destination Whitelist is empty, then the Coldcard will not consider the destination address when considering the rule.
If no rules are defined, then no PSBT will be signed. This can be useful for text message signing applications. On the other hand, a single empty rule, allows any transaction to be signed, so be careful!
Max Transaction Amount
Max amount per transaction is seems less useful because a number of transactions could be put together to “work around” this rule. However, if there is natural rate-limiting in your system, for example, by requiring a local operator to enter a code eeach time, then this is still helpful.
Authorizing Users
You can list username in the users field. If defined the min_users controls
how many of those are required. By default (if min_users isn’t defined), all users
listed must confirm the operation. You can achieve 2-of-5 and similar setups
using min_users. All users listed must already be defined on the Coldcard
before the policy is activated.
Limit to Named Wallet
The wallet field can be omitted, or set to the name of a multisig wallet. If set
to the string 1, it indicates this rule only applies to the non-multisig wallet.
Destination Whitelist
You may specify a list of addresses in the whitelist field. The Coldcard will only apply the rule if all destination addresses of the PSBT transaction are included in the whitelist. This is a powerful feature when your target wallets that you control, such as emergency cold wallets.
User Management

To support use of the Coldcard in HSM mode, the Coldcard can hold usernames and their shared secrets for authentication purposes. At present, this is only useful for use in HSM mode. The user’s login data (secrets) are stored exclusively on the Coldcard, and are never stored in the CKBunker.
Two methods are offered: shared password (ie. classic “something you know”) or TOTP (time-based one-time pass) 2FA authentication, compatible with RFC6238. Most people will already have an app on their mobile phone to hold the shared secrets and simplify the number-calculating process.
Creating new users can only be done over USB protocol with the
help of CKBunker or ckcc programs. However, once the user is
established, you may view it and remove them from the menu system
on the Coldcard, in the Advanced menu, under “User Management”.
The best practice is for the Coldcard to generate the password or TOTP secret and display it on-screen in a QR code. If you are using a TOTP app, such as Google Authenticator or FreeOTP, then you can scan the screen of the Coldcard to install the code. Unfortunately, due to limited screen space, there isn’t room for the meta data such as username or specific Coldcard number: your app will only show “CC”.
It is possible to send a user-provided password over USB, in which case, the QR code is not shown. This requires trust of the attached computer during this operation, and so we do not recommend it.
Click the (X) beside a username to remove it. This will invalid your HSM policy if that user is involved with a rule. You’ll need to change the rule, or create a new user with the old name.
Derivation Paths
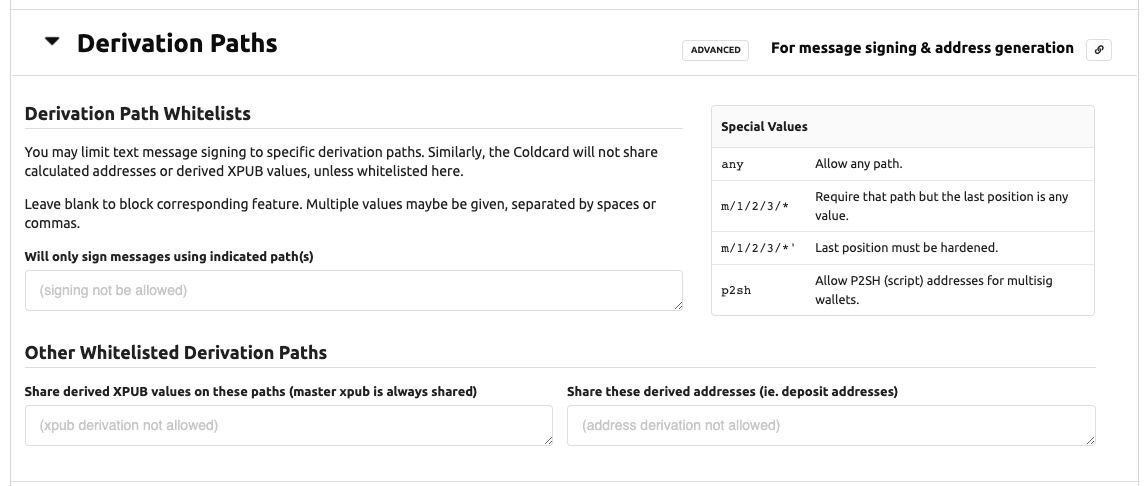
This section controls message signing and derivation paths allowed for sharing addresses and derived xpubs.

Message Signing
To enable text message signing, list one or more BIP32 derivation paths in this section.
You can use the special value any to allow all signing. You may also use a star
in the last position of a path, like these examples:
m/84'/0'/0/*m/84'/0'/0'/*'m/9984/*
The star allows any number in the final position (only). It does not allow deeper paths.
Sharing Xpubs
The Coldcard can calculate XPUB values for derived paths, if desired.
You can limit this feature by giving a list of permitted paths, or
the keyword any to allow any subpath. The master xpub (m)
is always available over USB protocol and cannot be disabled.
Share Derived Addresses
Similarly, the Coldcard can calculate wallet addresses, if this
setting contains a list of whitelisted derivation paths. Star
patterns, and the keyword any can be used, as well as the keyword
p2sh which allows addresses in multisig wallets to be shared.
In the case of multisig wallets, we do not check the script provided, beyond the normal checks for inclusion into a known multisig wallet.
Other Policy
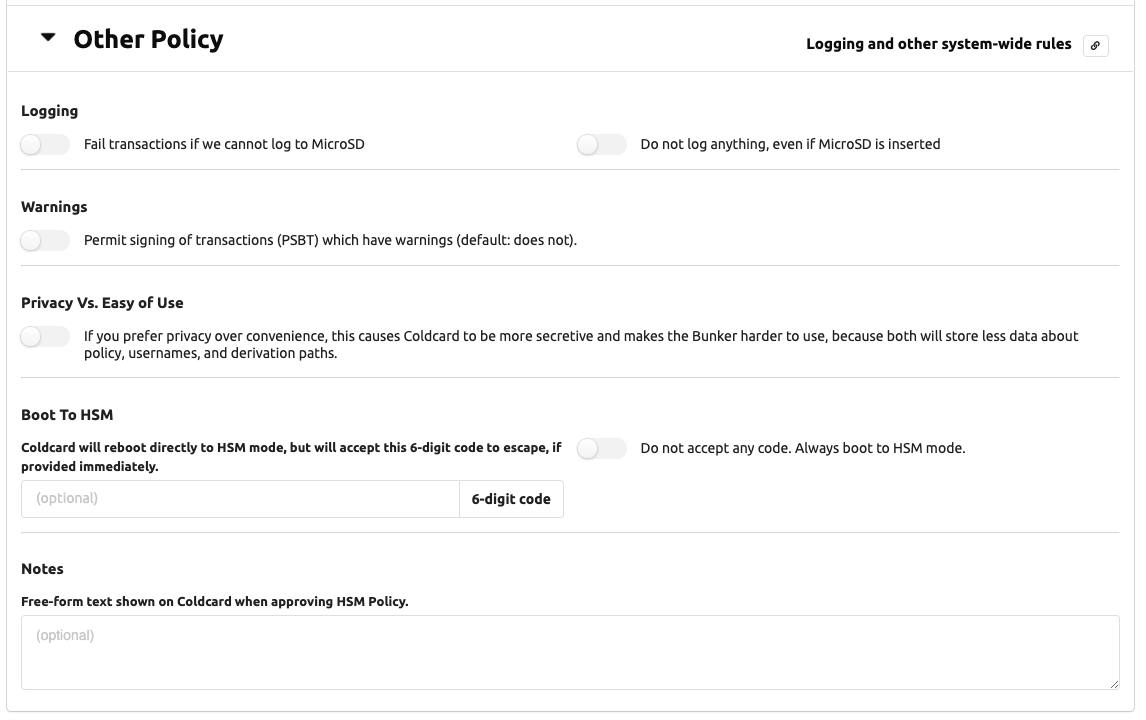
This section covers global policy choices. Most settings are simple booleans.

Logging to MicroSD Card
Two setting affect logging: Must log and Never log. By default, the Coldcard will log if a card is inserted. It does not fail if the card is missing. If that is an issue for you, then set Must log and transactions will be refused if the card isn’t installed and working. Never log is useful when you don’t want to keep records at the Coldcard’s location.
Warnings Okay?
This boolean allows the Coldcard to sign PSBT files that have warnings. Typically warning are generated by overly-large fees or weird path derivations. Since we don’t expect warnings, any transactions with a warning is normally refused.
Privacy over UX
During development of the Bunker, we found there were numerous status and informational values being shared over USB that, to some degree, assist potential attackers. However, those values are needed to provide a usable interface and a nice user experience (UX).
If you set Privacy over UX, the following values will not be shared over USB in the HSM status response:
- text summary of the spending policy
- count of approvals / refusals
- the number of time the storage locker has been read
- the period length
- when the period will end
- how much each rule has spent in current period
- system uptime
- list of usernames
- number of users which have provided auth credentials for current PSBT
The CKBunker can operate in either mode, but you will find it harder to use, as it’s not possible to know where you stand in terms of velocity spending and user authorization.
Boot to HSM
This feature forces the Coldcard to start in HSM mode immediately after boot up (after entry of the master PIN).
You specify a 6-digit numeric code and if that code is provided in the first 60 seconds after startup, the Coldcard will leave HSM mode. Alternatively, you may set Do not accept any code, and the Coldcard can never leave HSM mode.
!!! warning “Bricking Hazard”
No changes to firmware, HSM policy, Coldcard settings will be possible—ever again.

Not even the master PIN holder can change HSM policy nor escape HSM
mode! Firmware upgrades are not possible.
Boot-to-HSM is mainly useful mainly if the local operator does not have the authority to spend the funds, but does know the PIN code so they can assist with powerfail restart. In most applications, we expect someone with PIN knowledge and also the spending authority to power-up and enable HSM mode.
Notes
This is simply free-form text shown on the Coldcard when approving HSM Policy. Up to 80 characters allowed. You could put the master password and/or onion address here for documentation purposes.
Save and Start Policy
When you are happy with your HSM policy, press “Save and Start Policy”. You may want to capture a copy of the settings for later use. The CKBunker does not save the details (but may same a text summary) so it cannot re-create the policy rules completely. Coldcard saves the details but does not offer a means to share them later.
Once you’ve hit the button, the attached Coldcard will prompt you for approval. You will get to see the policy as the Coldcard understands it, and you should read that careful to confirm it matches you intentions.
After final approval, the HSM policy file is written into the Coldcard’s flash memory and it enters HSM mode. On subsequent reboots, you will be prompted to start HSM mode on each time.