ckbunker
Daily Operation: Signing PSBT Files
PSBT Files
You need to construct the PSBT file on another system. The CKBunker does not track the blockchain or know your UTXO. We will not make any assumptions about how you create PSBT files, and there are a growing number of wallets that can do it: BitcoinCore and Electrum for example.
For testing purposes, we recommend
psbt_faker which will
take your XPUB, and make arbitrary fake transactions immediately
suitable for signing as PSBT files.
This is a good way to test your policy choices with specific values and other what-ifs.
Sign Transaction Tab
Select “Sign Transaction” from the top bar, and you will see something similar to this:

The top is status dashboard, showing details of the Coldcard’s current state. Hover over those fields for additional detail, such as a breakdown of spending per rule.
At the bottom, a text summary, original from the Coldcard, shows the current policy in effect. For this example, the policy is as follows:
Transactions:
- Rule #1: Up to 1 XTN per period will be approved
- Rule #2: Any amount will be approved if local user confirms

Velocity Period:
 60 minutes
 = 1 hrs

Message signing:
- Allowed if path matches: (any path)

Other policy:
- MicroSD card will receive log entries.
- Storage Locker will be updated, and can be read 13 times.
The next step is to upload a PSBT file. Binary, hex or base64 encoded files are accepted. When you’ve done that, the screen will change:

If you want to know what the PSBT transaction will do, based on the Coldcard’s understanding of it, press the “Display” button. The PSBT is sent to the Coldcard, and the text summary of what it does will be shown on your web browser. This is the same text that would be shown on-screen if the Coldcard was not in HSM mode.
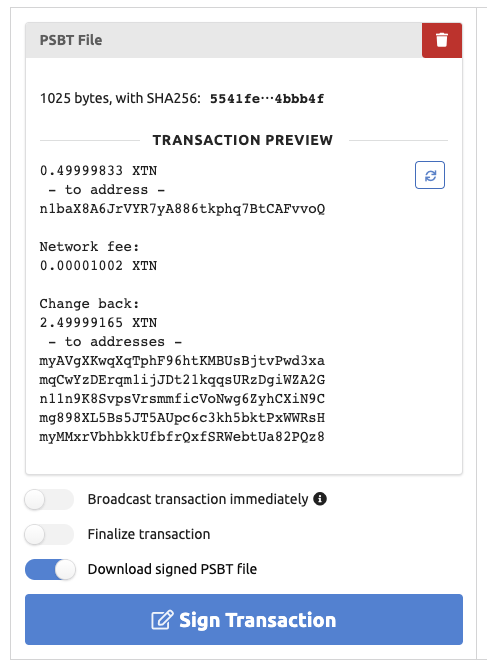
Depending on your goals, there are three toggles to consider now:
- Broadcast transaction immediately: CKBunker will send the finalized transaction to the Bitcoin P2P network for possible inclusion in the next block. Implies finalize.
- Finalize transaction: In addition to PSBT signing, ask the Coldcard to finalize the transaction. Resulting file will be hex, ready for broadcast.
- Download signed PSBT or transaction. Send the file to your browser immediately. You may not need the file if it’s broadcast already.
Adjust those to your needs, and press “Sign Transaction”.
If the transaction is acceptable to the policy, then it will be signed and broadcast directly, and/or downloaded to your browser.
The dashboard updates immediately after signing, and in this case, shows the updated velocity limits.

Local User Confirmation Code
The only local physical interaction possible with a Coldcard in HSM mode is to enter a local authorization code. This can be required by specific HSM policy rules, but is completely optional.
As the local operator enters the 6-digit numeric code, the digits are shown in the top right corner of the screen. Press OK to apply them, or X to clear and start over. Codes are always 6 digits. There is no indication the code worked or failed, in part because it isn’t tested until the PSBT is given for signing, which could be some time later.

The required code is a combination of the specific bytes of the PSBT file being approved, and also a salt value picked by the Coldcard.
When the PSBT file has been uploaded, use the CKBunker updates the local code:
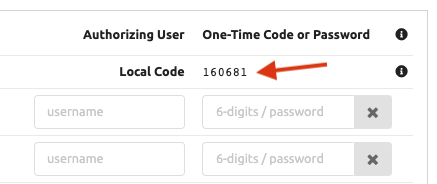
How you get this code into the Coldcard left to you. Please note the local operator must enter the code before you press the “Sign Transaction” button on the CKBunker.
A different code will be required for each attempted signing (because Coldcard changes the salt value) and for every PSBT file (because the hash of the PSBT is a factor in this number).
User Authorization
Depending on your configuration, you may see a number of username/password fields, in the top right area.
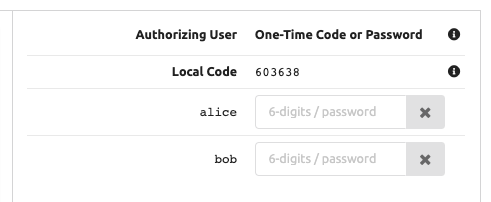
Enter the TOTP 2FA code (6 digits) from your app. If you are using passwords, enter that instead. If you have enabled “Privacy over UX”, you will need to enter the username on the left side as well. Obviously, both the username and password must be correct.
When you press “Sign Transaction”, all the OTP/password data you have entered is submitted before the PSBT is considered by the Coldcard. If do you provide codes/passwords, they must be right, or the Coldcard will not proceed. When values are omitted (left blank) then it is not an error, but of course, rules that require the user’s authorization will not be accepted.
“Meet Me In The Bunker” Usage Case
When multiple people need to authorize a transaction, they can all meet in the bunker: each user, from anywhere in the world, connects to the Bunker via Tor. Each will see the same state on the Sign Transaction page. One can can upload a transaction (PSBT) and press the visualize button. All the screens update at the same time. When each person is satisfied, they may enter their OTP code or password to help approve the transaction. The other users will see this happening in real time.
The CKBunker stores the current PSBT under consideration in RAM, so there is no need for this interaction to happen simultaneously. Users can come and go as needed to complete this process serially.